WordPress stands as the king of CMS world holding 59% of the market share.
The simplicity of installation & smooth access of plugins builds up the recommendation for WordPress over the rest of CMS based web site developing tools.
Nowadays, web hosts provide tools such as Softaculous as well as Fantastico in cPanel for a few clicks WordPress installation. FortuneHost too enriches the user experience by providing these tools in cPanel.
Apart from utilizing Softaculous or Fantastico users sometime choose manual installation owing to temporary technical difficulties, or feel uncomfortable with the tools.
So, let’s get acquainted with WordPress’s famous 5-minute installation. The installation process merely involves of 5 smooth steps as following.
1. Download of WordPress package.
2. Upload of package.
3. Creation of MySQL Database & User.
4. WordPress details Fill In.
5. & WordPress Installation Run.
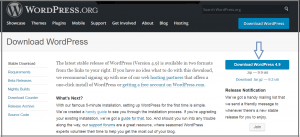
Step 1. Download of WordPress package.
a. Download latest & stable version of WordPress from the official website.
Step 2. Upload of package.
Unzip the downloaded package on pc.
Create directory under the hosting account where the WordPress will be installed and upload the extracted files/folders and directories to hosting account with the help of either of the three ways mentioned below.
a. File Manager in cPanel.
b. FTP (File Transfer Protocol) . Use FileZilla or CyberDuck as FTP client.
c. SSH (Secure Socket Shell). This should be enabled by web hosting providers for shared/reseller accounts.
- In case you wish to install WordPress directly on the domain (for example, http://yourdomain.com/), make sure to upload the installation files under root directory (for example, public_html in cPanel).
- In case you wish to install WordPress on a sub folder of the domain (for example, http://yourdomain.com/blog), make sure to create the directory ‘blog’ and upload the installation files under it.
NOTE: The latest versions of WordPress may require renaming the wp-config-sample.php file to wp-config.php
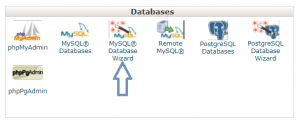
Step 3. Creation of MySQL Database & User.
MySQL Database will act as a storing facility of all posts, comments etc. along with themes & plugins and all the other data. Hence, it’s utterly important to create it.
cPanel at disposal makes it quite easier to create a database & user for WordPress installation.
Here’s how we do it.
a. Log in to cPanel.
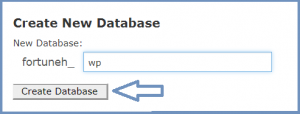
b. Under Databases click MySQL DatabaseWizard.
c. Create a database and name it as suitable.
d. Create an user for the database and assign it to the database.
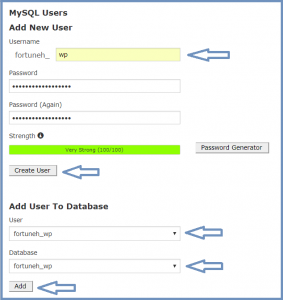
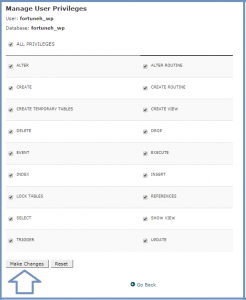
c. After adding the user the next page prompts for privileges. Assign privileges as necessary if the installation is for user account and full privileges if the installation is for an admin account.
Step 4. WordPress details Fill In.
Exit cPanel and access the URL where the WordPress needs to be installed. Your browser should direct you.
http://yourdomain.com
OR
http:..yourdomain.com/blog
Fill in all the asked details at the page.
a. Database Name: The database name created as above should be entered here.
b. Username: The database username created as above should be entered here.
c. Password: The database password created and assigned to it as above should be entered here.
d. Database Host: Mostly it’s localhost or it can be obtained from hosting provider.
e. Table Prefix: Use hard to guess prefix apart from usual ‘wp’ for security reasons.
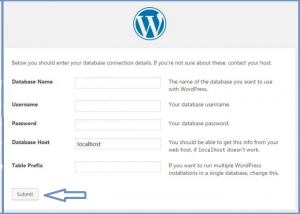
f. Click the Submit button at the end.
WordPress verify the entered details and it will come up with the confirmation page.
Step 5. WordPress Installation Run.
Hit Run the Install button in order to have WordPress load the next page.

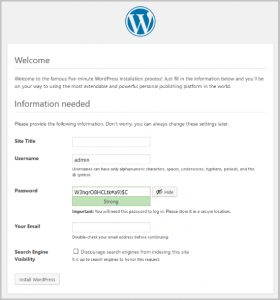
The next page prompts for administrative username and the title of your new WordPress site; fill in the details to proceed further. Be very sure to set a strong password in order to secure administrator account. Do not forget to specify a real & in-use email address as it would be later utilized to recover password in case you forget it. Additionally, mention whether or not you’d like search engines to index your site. Now press the Install WordPress button.
You successfully installed WordPress on your website. You can use the Log In button to access your WordPress administrative area to commence writing or updating your website.
Relax!